Are you struggling with stubborn tint glue residue on your car windows? Do not worry; we are here to save you from the struggle. This guide will walk you through easy and effective methods of removing tint glue without damaging your windows. Ready to restore your windows to their original clarity? Let’s get started!
Understanding Window Tint Glue Removal
Tint films do not magically adhere to your car windows. They have an adhesive lining attached to the inner side, which is typically pressure or heat-sensitive. It forms a firm bond with the glass to secure the tint. The durability of this adhesive backing maintains the tint’s function and appearance over time.
Removing a tint from a car window is all about maneuvering the tint glue off the window. It requires a combination of chemical solutions, heat, as well as mechanical techniques to break its bond with the glass.
A properly applied technique and useful tools ensure the glue is dissolved and lifted off the glass without leaving any residue or damaging the glass surface. Proper planning and a careful approach are essential to ensure that the glass surface remains protected.
Essential Window Tint Removal Tools
The right tools make all the difference when tackling a window tint glue removal project. Unsuitable tools or improper use of those tools can result in scratches on the glass. Each tool serves a unique purpose and requires proper handling for effective performance.
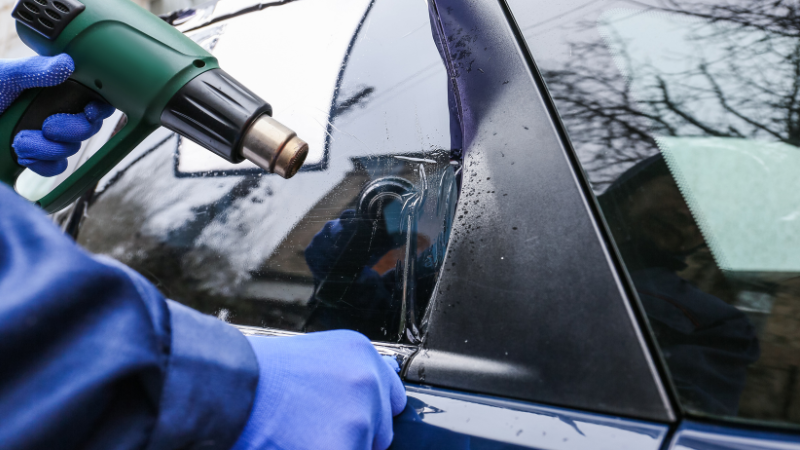
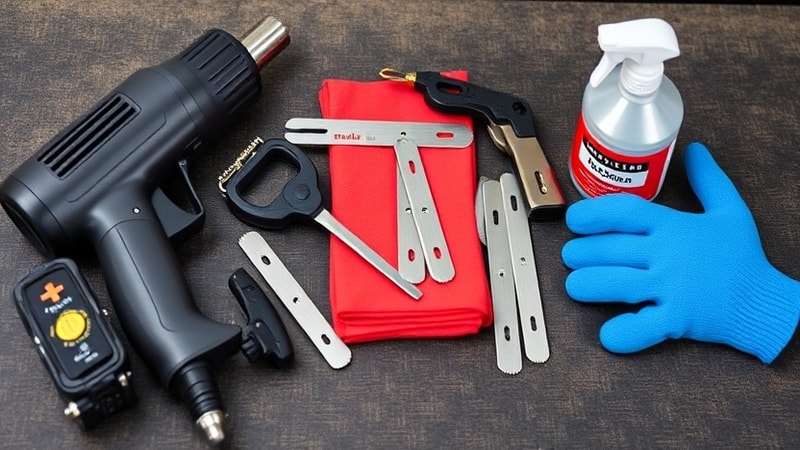
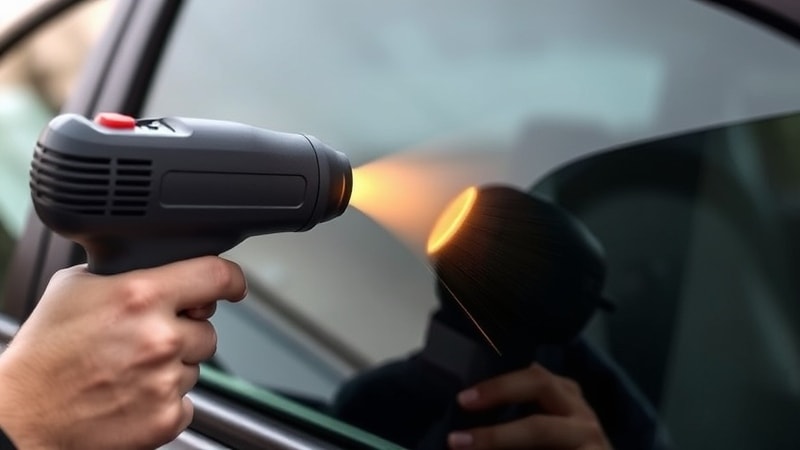
- Heat Gun: It is an indispensable tool in tint glue remover. As the glue is heat-sensitive, it becomes pliable after the application of heat, making it easy to peel away.
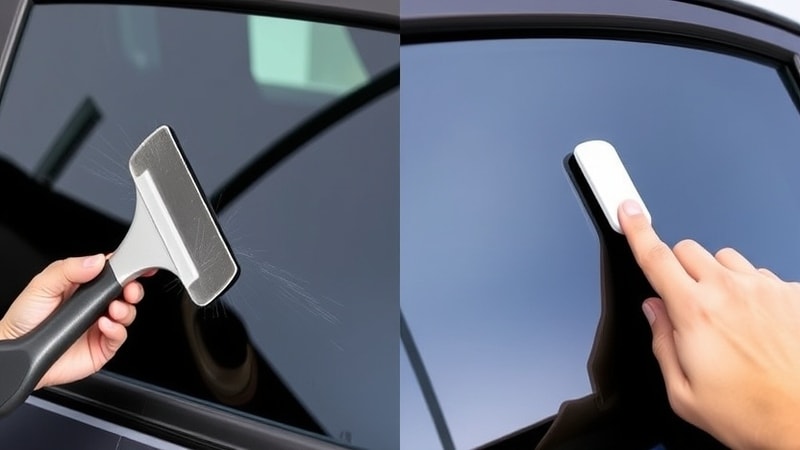
- Razor Blades/Scrapers: Use a professional-grade razor blade with a safety holder or a plastic scraper to effectively lift off softened glue from the window.
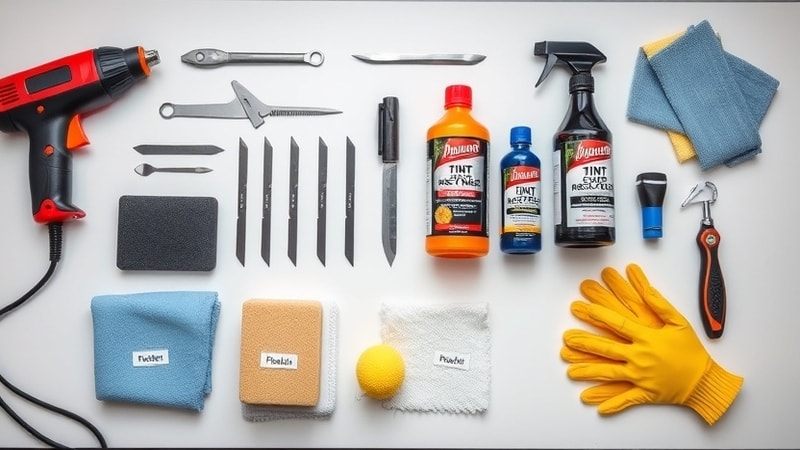
- Tint Glue Remover Products: Use commercial glue removal products to dissolve any glue residue on the window.
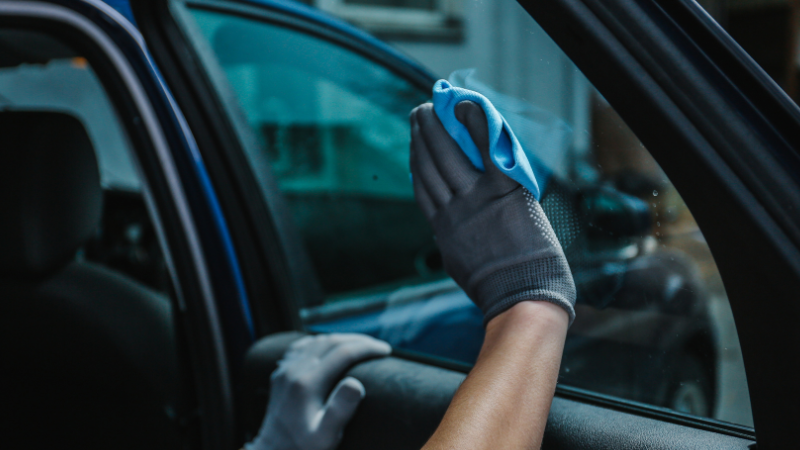
- Cleaning Cloths and Sponges: After removing the glue residue, wipe it all away with microfiber cloths or non-abrasive sponges like natural sponges. It is ideal to use a glass cleaner in the end to leave an impeccable surface.
- Gloves: It is recommended to add chemical-resistant (nitrile or latex) gloves to protect your hands while using adhesive removers or any harsh solutions.
How to Remove Window Tint Glue (Step-by-Step Guide)
After you have gathered the necessary tools, you can start your project.
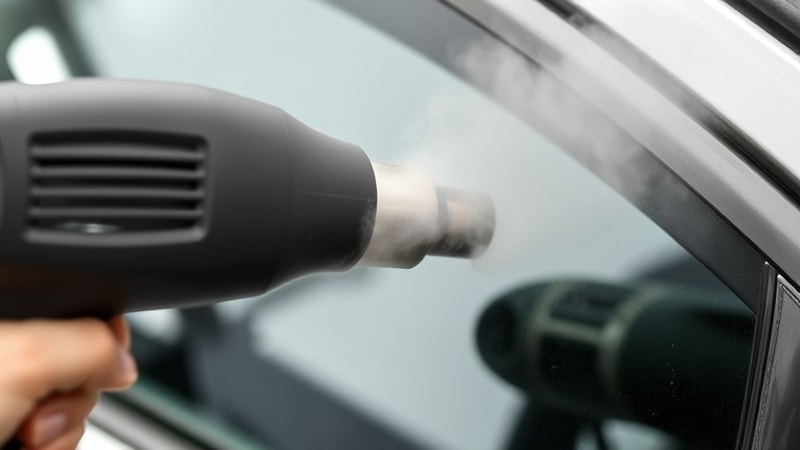
Heat The Glue: Hold the heat gun or steamer at least 6-8 inches away from the glass while moving it in a sweeping motion to distribute heat evenly. Work on small sections to avoid warping the window tint film.
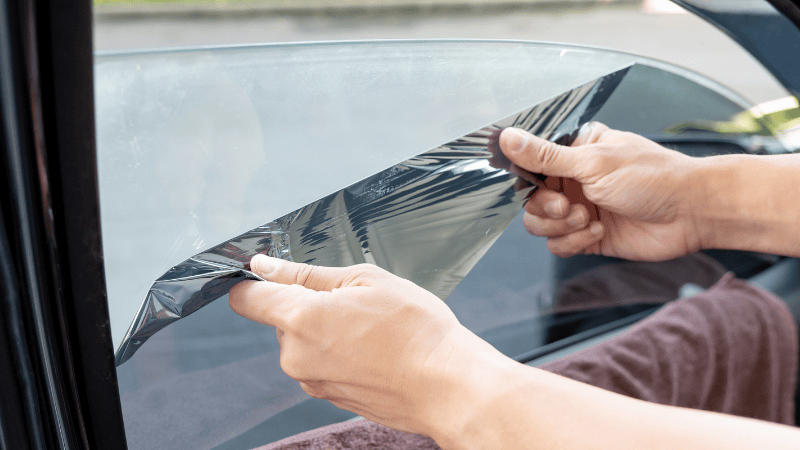
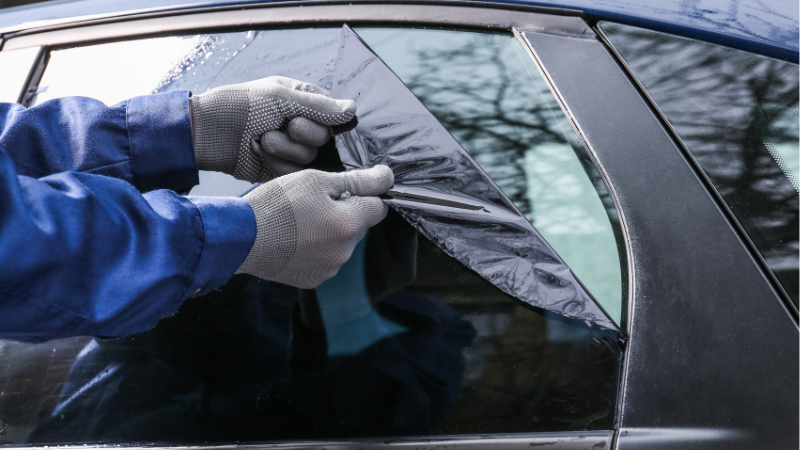
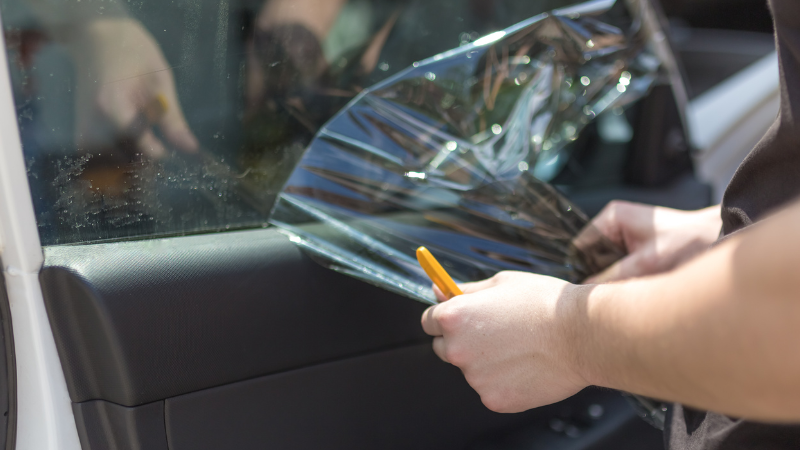
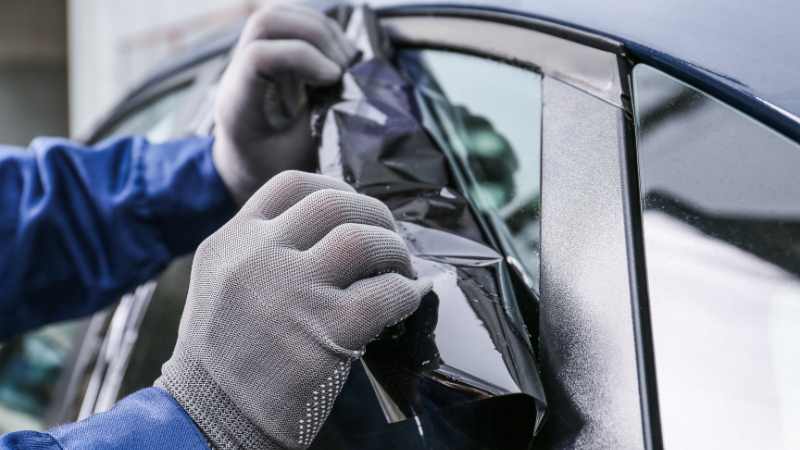
Peel Off the Tint: Once the glue is warm, start to peel by lifting one corner with the plastic scraper. Pull the tint slowly and steadily and avoid tearing it. Apply more heat if you feel any resistance while peeling off the tint.
Apply Tint Glue Remover: Spray or apply adhesive remover generously over the surface and let it stay for 5-10 minutes.
Scrape Off Residue: Use the plastic scraper again, or opt for a razor blade and start scraping the glue. Keep the blade at a shallow angle and work in one direction only to avoid scratching the window.
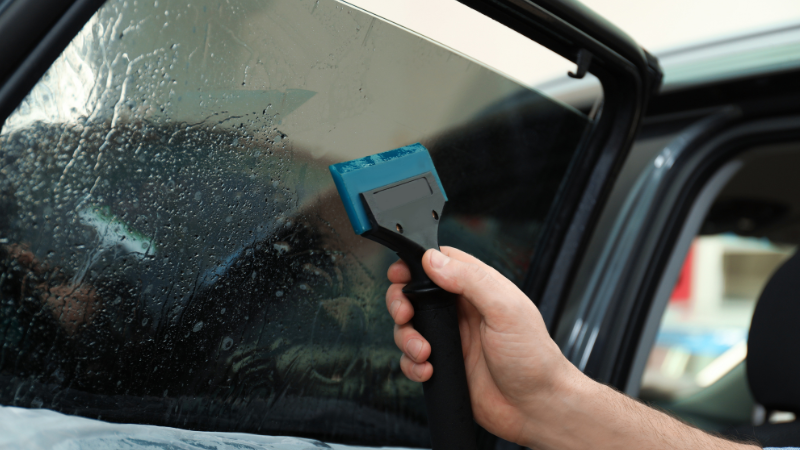
Clean the Window: Use glass cleaner or mix mild soap with water. Use a microfiber cloth dipped in this solution to remove any leftover glue residue. Dry the window with a clean cloth for a streak-free finish.

Best Practices for Removal
Removing tint glue is a meticulous process that requires not only skill but a lot of patience. Following proper protocol ensures that you achieve the desired results without damaging your window. Here are some best practices for window tint glue removal.
Preparation and Safety Precautions
It is important to prepare for the project before you begin.
- Keep all the gear handy, and do not substitute essential tools with common household items.
- Always wear gloves to protect your hands from harsh chemicals.
- Consider wearing safety goggles with indirect ventilation to protect your eyes as well
- Clean the window surface with a microfiber cloth before you begin to remove any dirt or debris
- Work in a well-ventilated area to prevent fume inhalation
- Do not apply excessive force while scraping residual glue, and only use gentle pressure to protect the glass.
- Test your products in a small area before general application to make sure they don’t cause any discoloration or damage.
Common Mistakes to Avoid When Removing Tint Glue
Even though it seems like a simple procedure, there are many things that can go wrong and cause permanent damage to your window. Here are some common mistakes to avoid when removing tint glue:
1. Using the Wrong Tools
Using the wrong tools, such as extremely sharp blades or abrasive scrapers, can leave scratches on the glass or damage defrost wires. Always utilize plastic scrapers or specialized razor blades with caution to avoid harming your windows.
2. Skipping the Prep Work
Failure to clean and prepare the window surface before proceeding can result in inconsistent results or make the glue more challenging to remove. Begin by wiping the surface with a moist cloth to eliminate dirt and debris, and make sure all equipment and materials are readily available. Proper preparation lays the groundwork for a smooth approach.
3. Applying Too Much Pressure
Applying too much pressure while scraping or peeling the tint might cause the glass to break or be damaged. Instead, apply reasonable, constant pressure and let heat or adhesive remover do the majority of the work.
4. Using Harsh Chemicals
Certain chemicals, such as acetone or ammonia-based cleansers, can degrade the car interior and window seal. You have to choose adhesive removers formulated specifically for tint glue or use milder alternatives such as rubbing alcohol or vinegar solutions. Always test the product on a small area first to ensure compatibility.
5. Rushing the Process
Removing window tint glue requires time and patience. Speeding the process can result in incomplete adhesive removal, streaks, or scratches. Allow the adhesive remover to sit for the required time, apply slow heat application, and carefully work section by section for optimal results.
Professional Tint Glue Removal Services
While DIY approaches might be beneficial, there are times when hiring a professional is the right choice. Professionals provide efficient services due to their experience and deep knowledge of delicate projects.
When to Hire a Professional
There are times when you cannot opt out of hiring a professional to complete a window tint removal job. If you are dealing with large areas with stubborn adhesive, you may require professional-grade tools to remove it effectively. Moreover, it is best to turn to a professional while working with luxury cars, vintage models, or vehicles with sensitive glass or defrost wires.
If you’re short on time, professionals can complete the job faster and more efficiently than DIY methods. Lastly, removing window tints with scratches, cracks, or looking for guides to choose the right percentages may require an experienced expert to avoid worsening the condition.
It is best to consult with a professional on time rather than attempting to do it yourself and damaging your vehicle. Here are some situations that necessitate you to hire a professional.
Advantages of Professional Services
There are some obvious advantages to hiring a professional for car services:
- They are trained in using the correct tools, products, and techniques, ensuring optimal results without causing any damage.
- They have access to specialized equipment such as industrial-grade steamers, adhesive removers, and tools that are more effective than DIY options.
- Hiring a professional reduces the chances of scratching the glass, harming defrost wires, or leaving residue behind.
- Professionals can complete the process quickly
- Many service providers include window cleaning or tint reinstall as part of their package, offering a one-stop solution to save window tinting costs.
Tips for Choosing the Right Service Provider
If you have decided to hire a professional, then follow these tips and find the right service provider for your needs.
- Check reviews and recommendations
- Ask about experience
- Compare prices of multiple window tint brands
- Verify Certifications
- Ensure warranty of services
Preventing Future Adhesive Issues
If you are a fan of window tints and plan on applying window tints, then you have to ensure you follow these steps to prevent any future adhesive issues.
- Compare different types of window tints and get the best one
- Ensure proper installation
- Cure it according to instructions
- Regularly clean the tinted window with cleaning skills
- Avoid using any harsh chemicals for cleaning
- Do not keep it under heat conditions for long
- Make sure the corners and surface of the tint are smooth
FAQs
Q1. What dissolves tint glue?
After softening the glue with a heat source, you can use adhesive removers, rubbing alcohol, ammonia-based cleaners, and a mixture of vinegar and water to dissolve any remnants.
Q2. Does WD 40 remove tint glue?
Yes, you can use WD-40 to soften and remove the tint glue. However, it leaves an oily finish, requiring another cleanse for a proper look.
Q3. Will nail polish remover remove window tint glue?
If the nail polish remover is acetone-based, then it can be used to remove window tint glue. However, it is a harsh chemical that can cause damage to a car’s interior if not managed properly.
Conclusion
Now that you’ve learned the proper removal steps and tools for window tint glue removal, it’s time to take on this daunting task. By following these steps and avoiding common mistakes, you can create a clean, damage-free finish. But if you’re tired of sticky residue and scratched glass, consider hiring a professional for a hassle-free experience!
Say Goodbye to Faded Tint: Get CARLIKE® Premium Window Tint Now!
Is peeling or purple haze ruining your view? Upgrade to CARLIKE®’s high-quality car window tint films – blocks 99% UV rays and reduces heat effectively. From windshield protection film to different finishes like dyed window tint film and ceramic carbon ones, you can choose the ideal window tint to refresh your car windows!
Limited bonus: Contact us now for live expert help with your window tint problems!